DO NOT FULLY TIGHTEN THE BOLTS BEFORE ASSEMBLING ALL THE PARTS
Assembly is easier with two people, one to hold the parts and a second person to insert the fixings.
Tools required: screwdriver and socket wrench - spanner and tong supplied
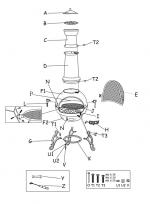
1. Assemble Legs (G) to Bottom bowl (F2) with the six M6 X 25 Bolts (T3), Washers (U1), Lock Washers (U2) and Nuts (V). Do not tighten the bolts, then assemble Legs (G) to Leg Ring (K) with the three M6 X 35 Bolts (T1), Washers (U1), Lock Washers (U2) and Nuts (V).
2. Top bowl (F1) and Bottom bowl (F2) are pre assembled.
3. Assemble Main Flue (D) to Top Bowl (F1) with three M6 X 30 Bolts (T2), Washers (U1), Lock Washers (U2) and Nuts (V).
4. Assemble Top Flue (C) to Main Flue (D) with three M6 X 30 Bolts (T2), Washers (U1), Lock Washers (U2) and Nuts (V).
5. Assemble Hook (N) to the left of the Bottom Bowl (F2) with pre assembled Bolts and Nuts, then assem ble Air Vent (H) to the right of the Bottom Bowl (F2) with pre assembled Bolts and Nuts .
6. Assemble Handle (L) to Top Bowl (F1) with pre assembled Washer, Lock Washer and Nut.
7. Attach Hook (N) on the left of Top bowl (F1) with pre assembled Bolts and Nuts, then assemble Mesh Door (E) to the right of Top Bowl (F1) with pre assembled Bolts, Washers, Lock Washers and Nuts.
8. Assemble the BBQ Grill Hinge Bracket (M) to the inside left of the Bottom Bowl with pre assembled Bolts , Washers ,Lock Washers and Nuts- do not tighten the fixings.
9. Check the Swing-out BBQ Grill (J) is level, then tighten Grill Hinge Bracket (M) fixings, then put Swing-out Grill (J) on Grill Bracket (M) and insert Pin (O).
10. Insert the Round Grate (I) into Bottom Bowl (F2).
11. Put Flue Grill (B) and Rain Lid (A) on Top Flue(C ).
Now check and tighten all fixings, assembly is complete.
DO NOT OVER TIGHTEN THE FIXINGS
;)
;)
;)
;)
;)
;)
;)
;)
;)
;)
;)
;)
;)
;)
;)
 UK
UK