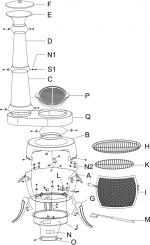
DO NOT FULLY TIGHTEN THE BOLTS BEFORE ASSEMBLING ALL THE PARTS
Assembly is easier with two people, one to hold the parts and a second person to insert the fixings.
Tools required: screwdriver and pliers - tong supplied.
Start from the legs and work upwards.
1) Assemble the 3 legs(G) to the bottom bowl (A) using 6 screws(S1) and 6 nuts(N1). Assemble the ash tray
(J) to the bottom bowl(A) using 3 screws (S1) and 3 nuts (N1).
2) First, put adapter (N) inside air vent. Then assemble air vent (P) to ash tray (J) using 2 screws( S1) and
nuts (N1)
3) Attach the top bowl (B) to the bottom bowl (A) using the rectangular brackets (N2) with 6 screws (S1) and
nuts(N1).
4) Assemble the BBQ grill bracket (L) to the bottom bowl (A) using 2 screws (S1) and 2 nuts (N1)
5) Screw the lower chimney section (C) to the top bowl (B) using 3 screws (S1) and nuts (N1).
6) Screw the upper chimney section (D) to the lower chimney (C) using 3 Screws (S1) and nuts (N1).
7) Screw the chimney funnel (E) to the upper chimney section (D) using 3 Screws (S1) and nuts (N1).
8) Put the lid (F) on the chimney funnel (E). Remove the lid when using the chimenea.
9) Fix the hinge bracket (L) to the assembled bowls and attach the mesh door (I).
10) Attach the BBQ grill (H) to the hinge bracket (L) if required. Place the charcoal grill (K) into bottom bowl
Tighten all fixings - Your Tia chimenea is now ready to use.
To protect from the direct heat of the fire we recommend you place a layer of sand in the bottom bowl.
ASSEMBLING THE CHIM STOVE UNIT
DO NOT FULLY TIGHTEN THE BOLTS BEFORE ASSEMBLING ALL THE PARTS
Assembly is easier with two people, one to hold the parts and a second person to insert the fixings.
1) Dis-assemble the lower chimney section (C) from the top bowl (B) by loosening and removing the 3 screws
(S1) and nuts (N1). Place the chimney in a safe place where it will not fall over.
2) Pickup the chim stove body (Q) and push the large lower opening onto the flange of the top bowl (B).
3) Supporting and keeping level the chim stove body (Q), insert three screws into the flange, securing the
chim stove body to the top bowl.
4) Re-assemble the chimney funnel assembly to the chim stove body using 3 Screws (S1) and nuts (N1).
5) Place the hotplate (P) on the chim stove body.
Tighten all fixings - Your Tia chim stove is now ready to use.
Important - After use thoroughly wash the hot plate to remove food residues and coat with vegetable cooking
oil, not mineral oil, to prevent rusting.
;)
;)
;)
;)
 UK
UK